Diamond cutting and polishing turns a rough diamond into a faceted gemstone through careful planning, shaping, and polishing. Cutters assess the rough stone before choosing how to divide it, shape its outline, and create its facets. Their decisions balance the finished diamond’s appearance, retained carat weight, and value.
Quick Summary:
How do they cut diamonds? The process begins with examining the rough diamond and planning the finished stone or stones. Depending on the rough, cutters may use cleaving, mechanical sawing, or laser sawing to separate it. Bruting shapes the girdle, particularly when creating a round diamond.
Facet polishing follows. For a round brilliant, blocking establishes the main facets, while brillianteering adds and finishes the remaining facets. Some stages may be repeated to refine the result. The sections below explain these steps, the equipment involved, and how cutting decisions affect the finished diamond.
Rough Diamond To Polished Diamond

|
1.) How To Begin With Rough Diamond?Back To Table Of Contents |
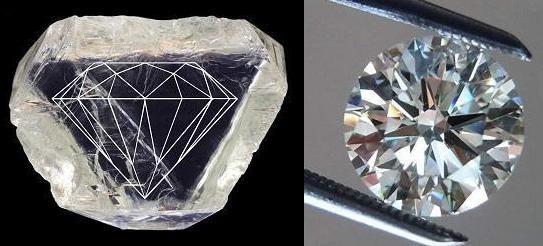
Begin by examining the rough diamond and planning what it can become. The cutter considers its shape, dimensions, weight, and inclusions before choosing the finished diamond’s shape and proportions.

|
1.a) Examining the Rough DiamondBack To Table Of Contents |
A rough diamond has a natural crystal form, rather than the deliberately arranged facets of a finished gemstone. During planning, the cutter considers where the table, crown, pavilion, and girdle will fit within the rough. Their eventual proportions influence the finished diamond’s appearance.
|
|
1.b) Selecting the Right Rough for CuttingBack To Table Of Contents |
The cutter compares possible shapes and cutting plans to make good use of the available material. For example, Sarine equipment can map the rough diamond’s external shape, while specialised inclusion-mapping systems reveal its internal features. Planning software then helps evaluate possible outcomes.
|
|
1.c) The Role of Carat Weight in Rough DiamondBack To Table Of Contents |
Carat measures weight, not dimensions. Cutting and polishing remove material, so the finished diamond weighs less than the original rough. However, retaining the most weight does not necessarily produce the most valuable result. The cutter must also consider colour, clarity, and cut quality.
|
|
1.d) Dealing with Inclusions and SymmetryBack To Table Of Contents |
Inclusion locations help guide the cutting plan. The cutter may remove an inclusion by cutting away the surrounding material, but this sacrifices weight. Alternatively, the plan may retain it within the finished stone. Symmetry requires separate attention to the alignment and arrangement of the finished facets.
Rough Diamonds
|
|
2.) How Does the Diamond Cutting Process Work?Back To Table Of Contents |
Diamond cutting and polishing transforms a rough stone into a faceted gemstone through planning, cleaving or sawing where needed, shaping, and facet polishing. First, the cutter evaluates the rough and establishes a cutting plan. Depending on that plan, mechanical or laser sawing may divide the stone, while bruting shapes the girdle. Polishing then creates and finishes the facets. However, these stages do not always follow a single fixed sequence. Cutters may repeat some steps to refine the diamond’s appearance and proportions.
|
|
2.a) From Rough Diamond to Polished GemstoneBack To Table Of Contents |
A rough diamond becomes a polished gemstone when cutters remove material to create its outline and carefully arranged facets. These flat surfaces, their angles, and their finish influence how the diamond interacts with light. The transformation therefore involves more than making the stone smaller or smoothing its surface.
Shaping establishes the diamond’s outline, while facet polishing develops the surfaces that form its cutting style. Together, the facets produce patterns of reflected light. Their proportions and workmanship influence brightness, flashes of colour called fire, and the sparkle and contrast known as scintillation.
However, adding more facets does not automatically make a diamond brighter. Their arrangement, proportions, polish, and symmetry matter more than the facet count alone. The finished result depends on how these features work together.
|
|
2.b) Planning and Marking the Rough DiamondBack To Table Of Contents |
Planning determines which polished diamonds a rough crystal can yield, while marking identifies where to divide it when necessary. The planner compares possible outcomes before committing to a cut. This decision considers the expected weight, colour, clarity, cut quality, and value of the finished stones.
Traditionally, a skilled specialist called the marker examines the rough diamond with a loupe and measures it with a gauge. After evaluating the options, the marker places a line on the crystal’s surface to guide sawing or cleaving. Although drawing the line appears simple, choosing its position requires careful judgement.
Modern planning can combine external scans with specialised inclusion mapping to build a more complete picture of the rough. For example, Sarine’s DiaExpert maps the external surface, while its Galaxy technology maps internal features. Planning software then helps compare possible cutting arrangements.
However, the plan that retains the most weight may not produce the highest total value. A different division can change the weight and anticipated quality of each finished diamond. Therefore, the important decision comes before material removal: a misplaced cut cannot restore the rough to its original form.
Diamond Marking
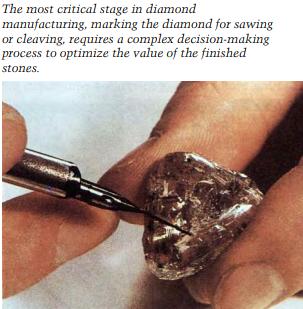
The marker examines the rough diamond with a loupe and, frequently, measures the dimensions of the diamond with a gauge. He then marks a black line on the diamond crystal’s surface. In the next step of the manufacturing process, the crystal will be either sawn or cleaved along this line.
|
|
3.) What Is the Cleaving of a Diamond?Back To Table Of Contents |
Cleaving is the controlled splitting of a rough diamond along a natural cleavage plane within its crystal structure. Unlike sawing, which cuts through material, cleaving separates the crystal along a direction where it splits more readily. This allows a cutter to divide suitable rough before further shaping and polishing.
However, a diamond’s exceptional resistance to scratching does not make it unbreakable. Cleaving exploits this distinction between hardness and resistance to fracture. It also depends on crystal direction, so cutters cannot simply split a diamond wherever the cutting plan requires.
|
|
3.a) How Diamond Cleavage WorksBack To Table Of Contents |
Diamond cleavage works because the crystal resists splitting less strongly in certain directions than in others. Its four cleavage directions run parallel to the triangular faces of an octahedron. These internal planes exist even when the rough diamond’s exterior looks irregular.
An octahedral diamond crystal helps illustrate this relationship. Its eight triangular faces show the orientation of the possible cleavage planes. However, this does not mean that every rough diamond has eight clearly visible faces or that every attempted split will succeed.
Octahedral Diamond Crystal
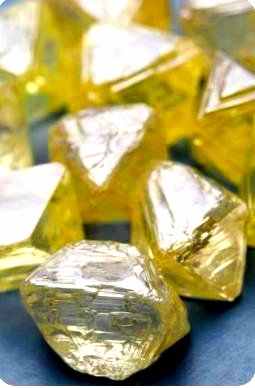
Octahedral Rough Diamond Crystal
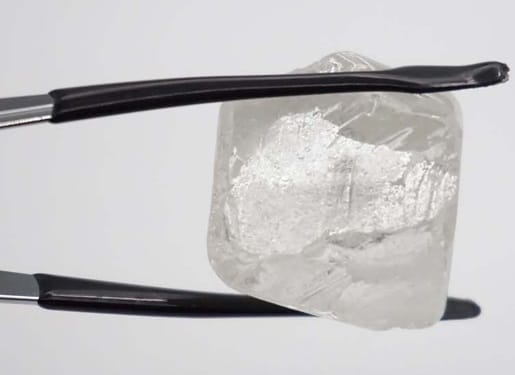
For a familiar comparison, think of a perforated sheet of paper. It tears more readily along the perforated line than across the intact sheet. Similarly, a diamond splits more readily along a cleavage plane than in other directions.
The comparison has a limit: diamond contains no perforations or ready-made gaps. Its tendency to cleave comes from the arrangement and bonding of carbon atoms. Therefore, the crystal structure guides the split, but it does not guarantee a flawless result.
Perforated Paper

|
|
3.b) Cleaving Tools and the Importance of Crystal DirectionBack To Table Of Contents |
Traditional diamond cleaving uses a holder, a prepared groove, a cleaving blade, and a small hammer. However, these tools work only when the cutter aligns them with a suitable cleavage plane. The crystal’s internal orientation determines where it can split, rather than the outline the cutter wishes to achieve.
The cutter secures the rough diamond and prepares a groove called a kerf. Traditionally, a sharp-edged diamond served as the grooving tool; laser equipment can also prepare the kerf. The cleaver then positions a blade in the groove and applies a controlled hammer blow to initiate the split.
Before preparing the groove, the cutter must identify the crystal’s cleavage directions. An irregular exterior can make this assessment difficult because it conceals the familiar octahedral form. Therefore, choosing where to place the blade requires more than inspecting the stone’s outline.
A laser-prepared groove does not create a new cleavage direction. It helps position the blade, but the split still depends on the diamond’s crystal structure. If the required division does not follow a suitable cleavage plane, the cutter needs another method, such as sawing.
Crystallographers describe diamond’s octahedral cleavage planes using the notation {111}, pronounced “one-one-one.” These numbers are Miller indices, which identify the orientation of crystal planes. For an optional introduction to this notation, watch the crystallographic-planes video below.
|
|
4.) What Is the Sawing of a Diamond?Back To Table Of Contents |
Diamond sawing divides a rough diamond by removing material along a planned cutting path. Cutters use mechanical saws or laser equipment to make the separation. Unlike cleaving, sawing does not depend on splitting the stone along a natural cleavage plane. However, crystal direction still affects mechanical sawing.
The cutting plan guides the choice of method, especially when the required division does not suit cleaving. Laser sawing offers greater freedom in cutting direction, while specialized laser systems also support diamond shaping and carving. Nevertheless, sawing is a preparation stage: the resulting pieces still require further shaping and facet polishing to become finished gemstones.
|
|
4.a) Mechanical Diamond SawingBack To Table Of Contents |
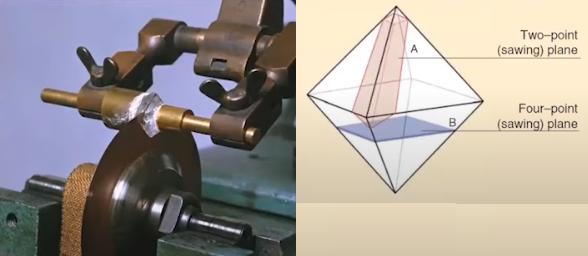
Mechanical diamond sawing uses a thin, motor-driven metal disc charged with diamond powder to cut through the rough stone. Traditional discs commonly use phosphor bronze, with diamond powder and oil applied to their edges. The abrasive diamond particles perform the cutting; the metal disc carries them.
The operator secures the rough diamond in a holder called a dop and gradually feeds it onto the rotating blade. Meanwhile, careful control of pressure helps the saw follow the planned cutting line. Motorization supplies the movement, but the operator still needs to orient the crystal and control its progress.
Crystal direction limits where mechanical sawing can work effectively. Two established orientations are the four-point plane, parallel to a cube face, and the two-point plane, parallel to a dodecahedral face. The accompanying crystal diagram illustrates these directions. However, they are sawing planes, not the octahedral cleavage planes described earlier.
Motorized Diamond Sawing Set Up
Historical accounts describe sawing diamonds with a thin wire moistened with diamond powder and oil. Like the rotating disc, this method used diamond particles as the cutting abrasive. Thus, the tool supplied the movement while the diamond powder performed the cutting.
|
|
4.b) Laser Cutting and Laser SawingBack To Table Of Contents |
Laser cutting uses a concentrated beam of light to remove diamond material along a planned path. Laser sawing specifically divides the rough into separate pieces, while laser cutting can also shape its outline. The beam supplies energy to remove material without a metal blade touching the stone.
In a laser-sawing setup, a computer-controlled holder moves the diamond beneath the beam along the programmed cutting path. The laser heats a small area intensely, removing material to form a groove. As cutting continues, the groove deepens until the pieces separate. Thus, precise movement helps translate the cutting plan into a physical division.
Unlike mechanical sawing, laser sawing can cut across crystallographic directions that restrict a conventional blade. This flexibility helps manufacturers work with complex rough crystals and choose cutting paths that mechanical equipment cannot readily follow. However, it does not mean that every possible path will produce a valuable finished diamond.
Laser sawing still carries a risk of breakage or damage, so accurate planning and process control remain essential. A narrow cutting path also removes some diamond material. Therefore, precision should mean following a suitable plan with controlled weight loss, rather than assuming that laser cutting is risk-free or waste-free.
|
|
4.c) Water Jet Guided Lasers and Diamond CarvingBack To Table Of Contents |
Water jet guided laser systems direct a laser beam through a fine stream of water to cut and shape diamonds. The laser removes the diamond material, while the water guides the beam, cools the cutting zone and washes away debris. Diamond carving extends material removal to decorative forms or patterns, rather than simply dividing the rough.
The water stream acts like an optical fibre, guiding light through total internal reflection at the boundary between water and air. This keeps the beam within the jet along its working length. Meanwhile, cooling and debris removal help control the conditions around the cut. Synova uses this principle in its Laser MicroJet technology.
Specialized equipment can combine several shaping operations. For example, Synova’s DaVinci system performs sawing, girdle shaping and facet cutting, reducing the need for separate conventional bruting and blocking stages. However, the manufacturer still specifies a final smoothing polish. Therefore, laser shaping should not be confused with a completely finished surface.
Laser technology also supports decorative work on diamonds. GIA documented a natural portrait-cut diamond with a laser-created checkered pattern on its pavilion. This provides a concrete example of patterned diamond carving, although it does not establish that water jet guidance produced that particular design. The distinction matters: laser decoration and water jet guided manufacturing are related capabilities, but one does not automatically imply the other.
|
|
5.) What Is Diamond Bruting?Back To Table Of Contents |
Diamond bruting, also called girdling, shapes the diamond’s outline at its girdle. In traditional mechanical bruting, one diamond abrades another to create the required shape. For a round diamond, this establishes its circular outline and diameter. However, bruting does not create the complete arrangement of polished facets.
The cutter follows the planned outline while controlling how much material the process removes. Excessive bruting can reduce the weight available for the finished gemstone. Therefore, this stage balances accurate shaping with retaining useful diamond material. The removed material also introduces the question of diamond dust and cutting waste.
|
|
5.a) How Bruting Shapes the Diamond’s GirdleBack To Table Of Contents |
Bruting shapes the girdle by gradually abrading the diamond’s perimeter to the planned outline. The girdle is the narrow section between the crown and pavilion of the finished gemstone. For a round diamond, the cutter establishes a centre of rotation and removes material around it to achieve the required diameter.
In a traditional setup, the cutter mounts the diamond on a holder called a dop and rotates it in a spindle. A second diamond presses against the rotating stone and wears away its surface. Some machines rotate both diamonds, shaping them through mutual abrasion. Meanwhile, the operator checks progress and adjusts the alignment as needed.
Accurate centring matters as much as the amount of material removed. If the stone rotates around the wrong centre, correcting its outline can require further grinding and reduce the usable diameter. Therefore, the cutter must establish the planned centre before pursuing a symmetrical outline. Removing more material cannot restore what has already been lost.
Bruting establishes the outline, but the girdle’s final surface can take different forms. A finished diamond may have a bruted, polished or faceted girdle. Consequently, a smooth or faceted girdle does not mean that the cutter skipped the earlier shaping stage.
|
|
5.b) What Happens to Diamond Dust and Cutting Waste?Back To Table Of Contents |
Diamond cutting waste can retain value as reusable offcuts or recoverable abrasive material. However, its possible uses depend on the size, quality and condition of what remains. An intact diamond fragment may have further cutting potential, whereas fine diamond dust cannot become a faceted gemstone through polishing.
A sufficiently large, sound offcut may yield a smaller gemstone after further cutting and polishing. Such stones can serve as diamond accents in jewelry. Synova specifically describes reusing chips separated from rough diamonds during laser cutting. Nevertheless, not every fragment has the dimensions or gem quality needed for jewelry.
Diamond grit and powder have abrasive uses in cutting, grinding and polishing. USGS also documents recycling of industrial diamond materials, including grit, dust and powder. However, this does not establish that every workshop recovers all its manufacturing dust or that collected waste is immediately suitable for reuse.
Therefore, “diamond shavings” is an imprecise description of several different materials. Solid offcuts, fine dust and abrasive powder have different possibilities for recovery. Weight removed from the main gemstone does not always become worthless, but its remaining value depends on what can actually be recovered and used.
|
|
6.) What Is the Diamond Polishing Process?Back To Table Of Contents |
Diamond polishing creates and finishes the gemstone’s facets by removing material at carefully controlled angles. In conventional manufacturing, the cutter holds the diamond against a rotating wheel called a scaife, charged with diamond powder. Thus, polishing does more than smooth an existing surface: it also establishes the flat faces that form the finished cutting style.
For a brilliant cutting style, blocking establishes the main facets, while brillianteering adds the remaining smaller facets. However, the cutter must also account for crystal direction, which affects how readily each surface takes a polish. Accurate facet placement and surface finishing work together, so smooth facets alone do not guarantee a well-proportioned diamond.
|
|
6.a) How a Scaife Polishes Diamond FacetsBack To Table Of Contents |
A scaife is a horizontally rotating metal wheel that uses diamond powder to create and finish diamond facets. The polisher holds the stone against its prepared surface at a controlled angle. As material comes away, a flat facet develops. Further polishing refines that surface to the required finish.
The wheel supplies movement, while the holding tool controls how the diamond meets it. A tang allows the polisher to set and maintain the facet angle and reposition the stone for other facets. Thus, the scaife does not determine the cutting design by itself. The cutter’s settings guide the size, slope and placement of each face.
Traditionally, the scaife’s working surface carries a mixture of diamond powder and oil. The powder provides the abrasive material needed for polishing. However, creating a facet and finishing its surface are connected tasks with different goals: one establishes its geometry, while the other improves its surface quality.
A highly polished facet can still sit at an unsuitable angle or meet its neighbours unevenly. Therefore, the cutter must assess both placement and finish. A mirror-like surface shows the quality of that surface, but it does not establish the quality of the diamond’s entire cut.
|
|
6.b) Blocking and BrillianteeringBack To Table Of Contents |
Blocking establishes a diamond’s main facets and basic proportions, while brillianteering adds and finishes the smaller facets of a brilliant cutting style. Together, these stages develop the facet arrangement. However, the familiar facet counts apply to particular designs, rather than every diamond shape.
During traditional round-brilliant blocking, the cutter may begin with four main crown facets and four main pavilion facets. Further work establishes eight main facets on each side. Together with the table and an optional culet facet, this creates a basic arrangement of 17 or 18 facets, corresponding to a single-cut pattern.
Brillianteering adds the star facets and the upper and lower half facets, also called upper and lower girdle facets. In a standard round brilliant, these comprise eight stars, sixteen upper halves and sixteen lower halves. The resulting design has 57 facets without a culet facet, or 58 with one. This conventional count excludes any small facets on the girdle itself.
The smaller facets refine how the diamond handles light, so their placement deserves as much care as the main facets. Nevertheless, reaching a particular facet count does not guarantee attractive brightness, fire or scintillation. The cutter must maintain suitable proportions and alignment throughout both stages.
|
|
6.c) Why Crystal Direction Matters During PolishingBack To Table Of Contents |
Crystal direction matters because diamond resists polishing more strongly in some orientations than in others. A facet may polish readily in one direction but resist material removal in another. Therefore, the cutter must consider both the facet’s position within the crystal and the direction of movement across the scaife.
Cutters often describe this directional behaviour as the diamond’s grain. A favourable polishing direction is sometimes called the “soft grain,” but this does not mean that the stone contains a physically soft patch. Instead, it describes a direction in which the surface offers less resistance to polishing.
The relevant relationship is between the crystal orientation and the wheel’s movement at the contact point. Consequently, finding a workable polishing direction involves more than setting the facet’s slope. Two facets on the same diamond may require different working orientations, even though both form part of the approved cutting design.
Natural surface features, such as triangular growth or etch features called trigons, can help an experienced polisher assess crystal orientation. However, these clues are not always available or sufficient. Some automated polishing systems can also search for a favourable direction by measuring whether material removal occurs.
This explains why an unresponsive facet does not automatically need more pressure or a faster wheel. The working direction may be unsuitable. Even with modern equipment, cutters must account for resistant crystal orientations while maintaining the intended facet geometry.
|
|
6.d) What Research Explains About Diamond PolishingBack To Table Of Contents |
Research shows that diamond polishing can involve changes in carbon bonding as well as mechanical wear. Under suitable conditions, the ordered diamond surface can develop a thin layer of disordered, non-diamond carbon. This helps explain how polishing removes material from such a resistant crystal. However, no single mechanism describes every polishing method and working condition.
Electron microscopy research examined debris produced during diamond polishing and found predominantly amorphous carbon, which lacks diamond’s regular crystal structure. The researchers also detected a small number of nanometre-sized diamond particles from polishing in a resistant direction. Therefore, the evidence supports surface transformation without implying that all polishing debris contains no diamond.
In a 2011 study, Lars Pastewka and colleagues used molecular dynamics simulations to investigate this transformation. Their model showed mechanical action producing a disordered carbon layer whose growth depended on surface orientation and sliding direction. The calculated behaviour agreed closely with experimental wear rates. This provides an explanation supported by a model, rather than a direct observation of every atom during workshop polishing.
Later computational research examined how surface chemistry, stress and attached molecules affect diamond wear. A 2023 study investigated oxygen, hydrogen and water-derived species under specified atomic-scale conditions. Such work helps explain why the surrounding chemistry can influence material removal. Nevertheless, results from a particular model should not become universal claims about every scaife or polishing process.
The useful conclusion is that polishing involves more than simply scratching away unchanged diamond particles. Mechanical action can alter surface bonding, while chemical interactions can influence how material leaves the surface. Consequently, scratch width alone cannot establish the removal mechanism, and amorphous carbon should not automatically be described as graphite.
Diamonds can occasionally emit light during polishing, a phenomenon often called triboluminescence. In a 2007 study, researchers examined this light and proposed electroluminescence, or electrically stimulated light emission, as its explanation. However, this was a proposed mechanism; describing the diamond as a light-emitting diode would overstate the finding.
|
|
7.) What Does a Modern Diamond Polishing Setup Look Like?Back To Table Of Contents |
A modern diamond polishing setup combines a motor-driven scaife with tools that hold and position the diamond accurately. In a conventional polishing station, the dop secures the stone, while the tang controls its presentation to the wheel. Together, these components help the polisher maintain the intended facet angles.
However, modern manufacturing can also include computer-controlled cutting and automated polishing equipment. The cutter must balance operating speed, contact pressure and heat while checking the developing facets. Thus, a useful way to understand the setup is through three tasks: holding the stone, controlling material removal and checking the result. Automation changes how manufacturers perform these tasks, but the finished diamond still needs accurate proportions, symmetry and surface finish.
|
|
7.a) The Scaife, Dop and TangBack To Table Of Contents |
The scaife, dop and tang perform three distinct jobs during conventional diamond polishing. The scaife is the rotating metal wheel that works the diamond’s surface. Meanwhile, the dop grips the stone, and the tang supports the dop and controls the angle of contact. Together, they let the polisher position each facet accurately without holding the diamond directly.
And this is what a modern setup for diamond polishing process looks like:
Modern Diamond Polishing Setup
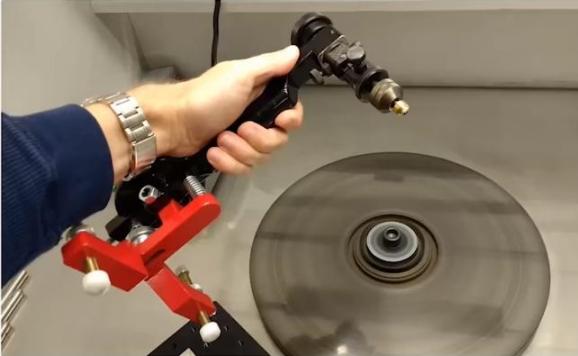
The dop must secure the diamond while leaving the working area exposed. Some designs use a jaw-like grip, although the holding arrangement varies with the stone and the task. Therefore, a dop used for one part of the diamond may differ from the holder used for another.
Tang Unboxing
The tang provides a stable platform for setting and maintaining the facet angle. Its adjustment mechanisms help the polisher make controlled angular changes. In addition, indexing mechanisms on suitable tools help position successive facets around the stone. This separates two essential adjustments: the facet’s inclination and its position around the diamond.
For the reader, the useful distinction is between gripping and positioning. The dop keeps the stone secure; the tang helps present it accurately to the scaife. However, a firm grip alone cannot establish the intended facet geometry. The holding and adjustment mechanisms must work together.
|
|
7.b) Polishing Speed, Pressure and TemperatureBack To Table Of Contents |
Polishing speed, contact pressure and temperature influence how quickly a scaife removes diamond material and the finish it produces. These factors interact, so the polisher must balance them rather than simply increase speed or force. The aim is controlled material removal without damaging the working surface.
Technical literature describes conventional scaifes operating at around 3,000 revolutions per minute. However, this is a reported operating speed, not a universal optimum for every machine or diamond. Moreover, the wheel’s surface moves faster farther from its centre. Therefore, rotational speed alone does not fully describe the conditions where the facet touches the scaife.
Contact pressure also affects the polishing rate, but its relationship with material removal is not always straightforward. Experiments show that load and sliding speed can jointly determine when substantial wear begins. Consequently, pressing harder does not guarantee a proportionate increase in useful polishing.
Excessive heat can spoil the surface finish. GIA identifies polishing burns as whitish haze caused by overheating, including marks where the dop touches the diamond. Thus, temperature control protects the facet’s appearance as well as supporting the manufacturing process.
Some green diamonds require particular care because heat can alter radiation-related colour features. However, green colour has several causes, so a single temperature limit cannot describe every green diamond’s response. The practical lesson is to assess the stone’s colour characteristics before polishing and avoid uncontrolled heating.
|
|
7.c) Computer Controlled Cutting and Automated PolishingBack To Table Of Contents |
Computer-controlled cutting uses programmed machine movements to remove diamond material according to a planned shape. Automated polishing equipment handles selected facet-forming and finishing operations with less manual adjustment. However, these technologies perform different tasks: creating the intended geometry and producing a smooth facet surface are distinct manufacturing goals.
Digital planning provides the instructions that guide production. For example, Sarine’s Advisor software integrates inclusion-scanning data and lets planners compare alternatives involving carat weight, clarity and cut. Thus, the computer helps evaluate competing outcomes rather than simply choosing the largest possible finished diamond.
Automated scaife polishing must also accommodate the diamond’s directional differences in resistance to wear. GIA describes machines that seek a suitable polishing direction by bringing the stone into gentle contact with the scaife and measuring material removal. This feedback helps the equipment respond to the stone instead of relying only on a fixed movement sequence.
Other systems automate shaping through laser machining. Synova’s DaVinci Diamond Factory, for example, changes facets automatically after detecting that a cut has finished. According to the manufacturer, it combines several shaping operations while leaving a final smoothing step. Therefore, automated laser faceting should not be confused with completing every aspect of the surface polish.
The useful distinction is between automation and the finished result. A machine can repeat programmed movements, but those movements must serve an appropriate cutting plan. Likewise, an automated shaping process may still require separate finishing. The term “computer-controlled” describes how equipment operates; it does not, by itself, establish the quality of the diamond.
|
|
7.d) The Diamond Cutter’s Role in Quality ControlBack To Table Of Contents |
The diamond cutter’s role in quality control is to check that the developing stone meets the intended proportions, symmetry and surface finish. These checks involve different questions: whether the facets have the planned angles, whether they align correctly and whether their surfaces show polishing defects. A smooth-looking facet alone cannot answer all three.
Proportion measurements reveal the diamond’s dimensions and facet angles. Meanwhile, symmetry checks examine the consistency and alignment of its parts, including variations between corresponding facets. Thus, the cutter must assess how individual facets fit into the complete design rather than judge each surface in isolation.
Polish inspection focuses on surface features such as scratches, polish lines, pits and burns. GIA assesses polish and symmetry features under 10× magnification when grading finished diamonds. However, the cutter’s manufacturing checks and an independent laboratory’s grading assessment serve different purposes. The former guides production and corrections; the latter evaluates the submitted stone.
Further polishing also removes material, so corrections involve a trade-off between improving the finish or geometry and retaining weight. GIA’s cut research considers weight ratio and durability alongside appearance and craftsmanship. Therefore, preserving the greatest possible carat weight should not become the sole measure of manufacturing success.
For readers, the useful lesson is that polish, symmetry and overall cut quality describe related but distinct aspects of a diamond. Excellent surface polish does not establish that the proportions suit the intended design. Quality control brings these assessments together before the manufacturer considers the stone complete.
|
|
8.) A Brief History of Diamond Cutting and PolishingBack To Table Of Contents |
Diamond cutting and polishing developed over centuries, from modest alterations of natural crystals to carefully planned arrangements of facets. Early point cuts largely followed the rough diamond’s octahedral outline. Later, improved tools and a growing understanding of light helped cutters develop more varied shapes and cutting styles.
However, this history involves changes in both equipment and priorities. Mechanized tools and angle gauges expanded what cutters could achieve, while computer-assisted methods later brought new ways to plan and measure diamonds. Thus, an older cut reflects the tools, weight-retention choices and aesthetic preferences of its period. Understanding that context helps explain why historical diamonds can look different from modern stones without losing their appeal.
|
|
8.a) Early Diamond Polishing and Historical DocumentationBack To Table Of Contents |
Early diamond polishing involved modifying natural crystal faces before cutters developed more elaborate facet arrangements. GIA places European polishing of diamond crystal faces as early as the 1300s. However, evidence that people traded or wore diamonds does not, by itself, establish when they began polishing them.
India played a central role in the early diamond trade. Indian stones reached Western Europe through trading routes that included Venice’s medieval markets. Nevertheless, this trade history alone cannot establish an exact date for the invention of polishing or prove how the technique passed between workshops.
A valuable written account comes from Benvenuto Cellini, the Italian goldsmith and sculptor whose treatises first appeared in Florence in 1568. His chapter on diamond cutting describes shaping stones by rubbing diamonds together. He then explains polishing with the resulting diamond powder mixed with oil, using holders against a rotating steel wheel.
Cellini’s description provides a concrete record of Renaissance workshop methods. However, he explicitly presents it as a general account of work outside his own craft. It therefore documents an established practice rather than proving that he invented it or wrote the earliest description anywhere.
The distinction between an early surviving account and the origin of a technique matters here. A dated text tells us what its author described at that time. It does not necessarily reveal when craftspeople first developed the method. For this reason, Cellini’s account is best presented as an important early description of diamond cutting and polishing.
These illustrations show historical diamond-working equipment and a polishing workshop.
Historical Diamond Polishing Equipment
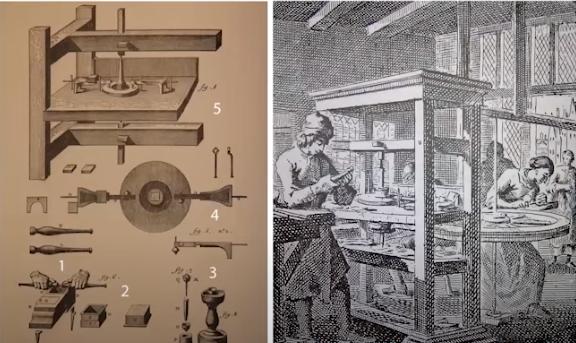
The illustration shows a belt connecting a larger drive wheel to the polishing wheel. However, the image alone does not establish the polishing wheel’s operating speed.
|
|
8.b) From Traditional Tools to Modern TechnologyBack To Table Of Contents |
Diamond-working tools evolved from hand-driven polishing wheels and simple holders to powered machinery, precision measuring equipment and computer-controlled systems. Some familiar components, including the polishing wheel and stone holder, remained useful. However, changes in power, measurement and control expanded what cutters could achieve with them.
By the mid-1800s, steam-powered diamond factories in Amsterdam combined mechanized equipment with specialized manual work. Later, bruting machines helped cutters produce round outlines, while angle gauges supported more consistent facet inclinations. Thus, mechanization changed both the pace of production and the practical possibilities for diamond design.
Around the beginning of the twentieth century, circular diamond saws made dividing suitable rough crystals easier. Cutting off a portion for a separate gemstone could preserve material that grinding would otherwise consume. Consequently, improved tools offered new ways to balance finished proportions with the use of valuable rough.
By 1997, GIA’s review of diamond manufacturing documented computer imaging, precision measurement, laser processing and automatic polishing equipment. These developments added planning and control capabilities beyond those of traditional hand-operated tools. Nevertheless, they built on established manufacturing tasks rather than replacing the need to understand the diamond.
The useful historical comparison is therefore continuity alongside change. A rotating wheel in an old illustration may resemble a modern scaife, but resemblance does not establish identical speed, accuracy or performance. Modern technology has changed how manufacturers plan, measure and control the work, even where parts of the equipment remain recognizable.
|
|
9.) Choosing the Right Diamond Cut for an Engagement RingBack To Table Of Contents |
Choose a diamond cut for an engagement ring by balancing the wearer’s preferred appearance, cut quality and budget. Start with a shape they enjoy, then assess how well the individual diamond handles light. A familiar shape name alone does not establish cutting quality.
First, distinguish the diamond’s outline from its facet arrangement and the quality of its execution. These choices influence its brightness, coloured flashes and sparkle. Meanwhile, consider carat weight alongside the appearance you want and the amount you can comfortably spend.
Before deciding, compare diamonds under similar lighting and review an independent grading report. Also, look beyond showroom spotlights to see how the stone appears in ordinary surroundings. An engagement ring will spend far more time in everyday light than under a jewellery counter’s dazzling display.
Choosing the perfect diamond cut also involves considering personal preferences and the style of the engagement ring. It’s essential to reflect on factors like the ring’s overall design, the type of metal for the setting, and your partner’s taste and lifestyle. These considerations ensure that the chosen diamond complements the ring’s design and resonates with the wearer’s style.
For broader buying guidance, see our guide: How To Choose A Diamond.
|
|
9.a) Diamond Shape, Cutting Style and Cut QualityBack To Table Of Contents |
Diamond shape describes the stone’s outline when viewed from above. Cutting style describes the arrangement of its facets. Cut quality evaluates how successfully its proportions and workmanship support appearance and durability. Although sellers sometimes use “cut” for all three, these terms answer different questions.
For example, an oval describes a shape, while brilliant describes a facet arrangement. Brilliant-style faceting appears in several shapes, including round, oval and marquise diamonds. Meanwhile, step cuts use rows of elongated facets, as seen in emerald cuts. Choosing a cutting style establishes a visual character, but it does not guarantee excellent workmanship.
Cut quality considers how the cutter brings the design together. Facet proportions, alignment and surface finish all matter. However, excellent polish and symmetry alone do not establish excellent overall cut quality. A precisely finished diamond can still have proportions that limit its light performance.
GIA’s standard cut-grading system for round brilliant diamonds in the D-to-Z colour range has five grades: Excellent, Very Good, Good, Fair and Poor. Excellent is the highest grade on that scale. “Ideal” is not an additional grade within it, so combining the labels as “Ideal/Excellent” misrepresents the system.
However, GIA also offers a separate supplemental AGS Ideal Report for qualifying diamonds, including certain fancy shapes and facet arrangements. Therefore, the claim that only round diamonds can qualify as ideal is too broad. When a seller uses “ideal cut,” ask which grading system or documented criteria support that description. Check whether the label comes from a laboratory report, a supplemental assessment or the retailer’s own classification.
|
|
9.b) How Cut Affects Brightness, Fire and ScintillationBack To Table Of Contents |
A diamond’s cut influences how light enters, reflects within and leaves the stone. Brightness describes its reflections of white light. Fire describes flashes of spectral colour. Meanwhile, scintillation combines sparkle during movement with the pattern of bright and dark areas.
Brightness, often called brilliance, includes both internal and surface reflections. Facet angles and proportions influence how much light reaches your eye. However, table size or pavilion angle alone cannot establish performance; the proportions must work together.
Fire occurs when diamond separates white light into its component colours through dispersion. The facet arrangement influences how those colours emerge as visible flashes. Consequently, a diamond’s display of fire depends on both its cutting and the surrounding lighting.
Scintillation becomes apparent as the diamond, observer or light source moves. Facets alternate between bright reflections and darkness, creating sparkle. Some contrast helps those flashes stand out. Therefore, every dark area is not automatically a defect; its size, arrangement and behaviour matter.
For a useful comparison, view diamonds under the same lighting and gently tilt each one. Diffuse light helps reveal overall brightness, while small, concentrated light sources bring out fire and sparkle. Also, compare them in ordinary surroundings. A stone that dazzles under showroom spotlights may look quite different at home, so assess the changing pattern rather than one impressive flash.
|
|
9.c) Balancing Cut Quality, Carat Weight and BudgetBack To Table Of Contents |
Balance cut quality, carat weight and budget by choosing attractive cutting before chasing a higher weight. Set a comfortable spending limit for the complete ring, including its setting. Then compare diamonds that offer the appearance you want within that limit.
Carat measures weight, not the diamond’s width or visible size. A heavier stone can carry extra weight in its depth or a thick girdle without looking noticeably larger. Therefore, compare face-up dimensions as well as carat weight, especially between diamonds of the same shape. Extra weight has limited value to you if it adds little visible size and compromises appearance.
Our guide explores other Ways To Make A Diamond Look Larger.
For standard round brilliant diamonds, GIA recommends considering Excellent or Very Good cut grades. However, compare the actual stones rather than assuming every diamond within a grade looks identical. A slightly lighter diamond with attractive proportions may suit you better than a heavier one with a dull appearance.
Also, compare weights just below popular thresholds, such as 1.00 carat. For example, a well-proportioned 0.98-carat round diamond may look very similar in size to a comparable 1.00-carat stone. It may also cost less, although savings depend on the individual diamonds and their other quality factors. Avoid choosing a stone solely because it falls below a price threshold.
Finally, consider whether higher colour or clarity grades produce a visible improvement that matters to you. Some diamonds with lower grades remain appealing without magnification, but assess each stone individually. The useful question is what the extra spending improves: visible size, appearance or a quality characteristic you personally value.
|
|
10.) How Do Different Diamond Shapes Affect Appearance and Brilliance?Back To Table Of Contents |
Different diamond shapes change the stone’s outline, while their associated facet arrangements influence its pattern of reflections and sparkle. Brilliant-style cuts generally create numerous lively flashes. In contrast, step cuts offer broader reflections and a more geometric appearance. However, shape alone does not determine brilliance; the individual diamond’s proportions and workmanship also matter.
For example, emerald and radiant cuts can share a similar rectangular outline yet display distinctly different reflection patterns. Likewise, two diamonds of the same shape can differ noticeably in appearance. Therefore, compare individual stones under similar lighting rather than treating shape names as a ranking from best to worst.
The following comparisons introduce ten familiar shapes, their visual character and the practical details to examine. Use them to identify the appearance you enjoy, then assess the particular diamond. A quieter pattern of broad reflections can be just as appealing as a busier display of sparkle.
| Shape | Typical Reflections | What to Check |
|---|---|---|
| Round brilliant | Lively brilliant-style sparkle | Compare individual stones, even within one cut grade. |
| Princess | Brilliant sparkle; angular outline | Check protection at all four pointed corners. |
| Emerald | Broad, orderly step-cut reflections | Inspect visible inclusions through the open facets. |
| Cushion | Broad flashes or finer sparkle | Compare facet patterns before choosing your preferred look. |
| Oval | Brilliant sparkle; elongated outline | Watch the central bow-tie pattern in motion. |
| Radiant | Busy, sometimes fragmented sparkle | Choose whether you enjoy the finer reflection pattern. |
| Asscher | Layered, geometric step-cut reflections | Inspect visible inclusions and pattern alignment. |
| Pear | Brilliant sparkle; teardrop outline | Check matching curves and protection at the tip. |
| Heart | Brilliant sparkle; distinctive silhouette | Check matching lobes and a clearly visible cleft. |
| Marquise | Brilliant sparkle; elongated, pointed outline | Check aligned tips and protection at both ends. |
Choose the reflection pattern you enjoy, then assess the individual diamond and its setting. Shape alone does not guarantee cutting quality.
|
|
10.a) Round Brilliant DiamondsBack To Table Of Contents |
Round brilliant diamonds combine a circular outline with a facet arrangement designed to produce brightness, fire and lively sparkle. The standard design has 57 facets, or 58 when it includes a culet facet at the bottom. Its familiar appearance suits solitaire, halo and three-stone rings, as well as vintage and modern settings.
14K Yellow and White Gold 1/2 Cttw Natural White Round Diamonds Engagement Ring
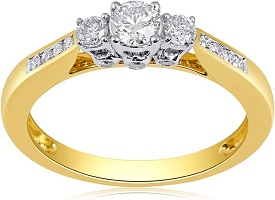
View Round Diamond Ring Details on Amazon
However, a round outline does not guarantee strong light performance. Look for a balanced pattern of bright and dark reflections as you gently move the diamond. For standard round brilliants in the D-to-Z colour range, a GIA cut grade provides a useful starting point. Then compare individual stones under the same lighting.
Brilliant faceting can make some inclusions and body colour less noticeable, but it does not conceal every clarity feature. Therefore, inspect the particular stone rather than relying on its shape to disguise imperfections. Also, check the girdle: an extremely thin edge can remain vulnerable to chipping, even on a diamond without pointed corners.
2.70 ct Round Cut Diamond Eternity Wedding Band Ring
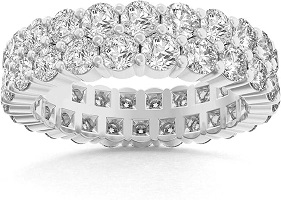
View Eternity Band Details on Amazon
|
|
10.b) Princess Cut DiamondsBack To Table Of Contents |
Princess cut diamonds combine a typically square outline and pointed corners with modified brilliant faceting. Their angular appearance offers an alternative to the round brilliant while retaining lively sparkle. Rectangular versions also exist, and different facet arrangements can produce noticeably different reflection patterns.
When comparing stones, examine the balance of bright and dark areas as you gently tilt each diamond. Also, compare its face-up dimensions: a princess cut can carry substantial weight in its pavilion without looking correspondingly large. Therefore, neither carat weight nor the shape name alone tells you how impressive the stone will appear.
The pointed corners need particular attention because they can chip from impact. V-shaped prongs or a suitably designed bezel can help protect these vulnerable areas. However, protection also depends on correct setting workmanship. For an everyday engagement ring, assess corner protection alongside sparkle rather than treating the mounting as an afterthought.
|
|
10.c) Emerald Cut DiamondsBack To Table Of Contents |
Emerald cut diamonds typically have a rectangular outline, bevelled corners and concentric rows of step-cut facets. Their broad reflections create the characteristic hall-of-mirrors appearance. Compared with brilliant-style cuts, they generally offer less busy sparkle and a more geometric display of light.
However, the long facets can make inclusions and body colour easier to notice. Therefore, inspect the individual diamond without magnification as well as reviewing its grading report. A higher clarity grade may help, but no single minimum grade guarantees the appearance you want. The location and visibility of inclusions also matter.
Choose this cut because you enjoy its reflection pattern, rather than expecting it to imitate a round brilliant. Also, consider how the outline works with the ring design: a traditional lengthwise setting and an east-west setting create different visual effects. Neither orientation improves cutting quality; it changes how you wear the shape.
|
|
10.d) Cushion Cut DiamondsBack To Table Of Contents |
Cushion cut diamonds have a square or rectangular outline with curved sides and typically rounded corners, creating a pillow-like appearance. Their brilliant or modified brilliant faceting produces varied patterns of sparkle. The shape can suit a vintage-inspired ring, but modern cushions do not all share an antique-style facet arrangement.
Some cushions display broad, distinct flashes, while others show a finer, more fragmented pattern often called crushed ice. Therefore, compare several stones in motion to identify the look you prefer. A cushion outline alone does not tell you how large or crisp its reflections will appear.
Also, examine whether opposite sides and corners form a balanced outline. Rounded corners reduce exposed points, but they do not make the diamond immune to damage. An extremely thin girdle can still chip. Choose the individual stone for its appearance and sound proportions rather than assuming every cushion needs the same colour or clarity grade.
1 Carat Cushion Cut Diamond Engagement Ring in 10K Solid Gold
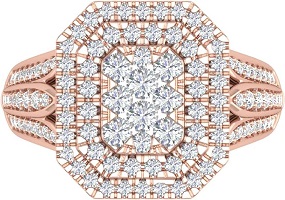
|
|
10.e) Oval DiamondsBack To Table Of Contents |
Oval diamonds combine an elongated, rounded outline with typically brilliant-style faceting. They offer lively sparkle and can appear larger than some round diamonds of similar carat weight. However, compare actual length and width measurements, because depth and weight distribution affect how much diamond you see from above.
When choosing an oval, examine its curves and whether opposite sides and ends look balanced. The length-to-width ratio describes how long or rounded the outline appears. However, it does not establish light performance, so choose a silhouette you enjoy and assess the stone separately.
Also, watch for the bow-tie effect, a dark pattern across the centre that can involve reflections of the observer. Its visibility changes with viewing conditions and movement. GIA research found that observers generally disliked broad, dark patterns that persisted as the diamond moved. Therefore, inspect a moving stone or clear video rather than judging it from one photograph. Subtle, changing contrast need not spoil an otherwise attractive oval.
These two ring designs illustrate an oval diamond set lengthwise and across the finger.
1.05 ct tw Dalilah Diamond Ring
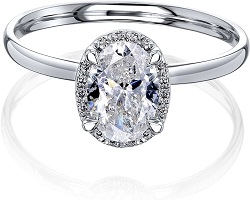
View Dalilah Ring Details on Amazon
1.13 ct tw Romantic East-West Oval Diamond Ring
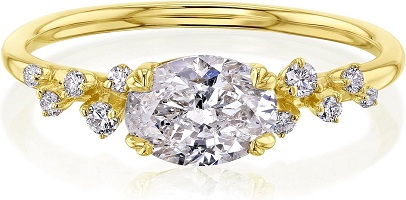
View East-West Oval Ring Details on Amazon
|
|
10.f) Radiant Cut DiamondsBack To Table Of Contents |
Radiant cut diamonds combine a square or rectangular outline with clipped corners and brilliant-style sparkle. They offer an angular silhouette similar to an emerald cut, but a busier reflection pattern. Some radiants display fine, fragmented reflections often described as crushed ice.
When comparing stones, look for parallel sides and evenly shaped clipped corners. Also, watch the reflections as the diamond moves rather than relying on its outline alone. Radiant proportions vary considerably, so a preferred length-to-width ratio describes your taste in shape rather than guaranteeing brilliance.
The faceting can make some inclusions less noticeable than they would be in an emerald cut. However, it does not hide every clarity feature, and cutting can also influence the diamond’s visible colour. Therefore, inspect the actual stone for both clarity and colour appeal. Choose a radiant because you enjoy its combination of geometry and sparkle, rather than assuming every example looks alike.
|
|
10.g) Asscher Cut DiamondsBack To Table Of Contents |
Asscher cut diamonds combine a square outline, bevelled corners and layered step-cut facets. Their broad, geometric reflections create a hall-of-mirrors effect that draws the eye towards the centre. Many also display a distinctive X-shaped pattern when viewed from above.
Unlike the busier sparkle of brilliant cuts, an Asscher’s appeal lies in its orderly reflections and sense of depth. Therefore, examine how the pattern changes as you gently tilt the stone. Look for a balanced outline and well-aligned facets rather than assuming an X-shaped pattern alone proves excellent cutting.
The open facets can make inclusions and body colour more noticeable. Also, deep proportions can place weight below the visible face, so compare dimensions alongside carat weight. Choose the individual diamond for its clarity, pleasing reflections and visible size, rather than applying one compulsory colour or clarity grade to every Asscher.
|
|
10.h) Pear Shaped DiamondsBack To Table Of Contents |
Pear shaped diamonds combine a rounded end with a tapered point, creating a teardrop outline. Brilliant-style faceting gives them lively sparkle, while their elongated silhouette offers a distinctive alternative to a round stone. Shorter, fuller pears and longer, narrower examples can have quite different visual character.
When comparing stones, imagine a line running from the rounded end to the point. The curves on either side should closely mirror each other, with balanced shoulders and a well-defined tip. Also, inspect the bow-tie pattern across the centre as the diamond moves. Subtle contrast can be attractive, but a broad, persistently dark band may distract from the surrounding sparkle.
The pointed tip needs protection because it is vulnerable to chipping. A properly fitted V-shaped prong or protective bezel can help shield it. Therefore, assess the setting alongside the diamond, and ask about inclusions near the point. Choose the outline you enjoy without overlooking the practical demands of wearing it.
|
|
10.i) Heart Shaped DiamondsBack To Table Of Contents |
Heart shaped diamonds combine a heart outline with brilliant-style faceting, giving them sparkle and a distinctive romantic appearance. Two rounded upper sections, called lobes, meet at a central notch, or cleft, above a pointed tip. However, the appeal depends on how clearly and evenly these features form the heart’s silhouette.
When comparing stones, imagine a line running from the cleft to the tip. Both halves should match in size and shape, with smooth curves and balanced lobes. Also, check that the cleft looks distinct and the point aligns with the centre. A wider or narrower outline can suit different tastes, but neither preference excuses visibly mismatched halves.
Finally, consider how the setting frames and protects the diamond. The pointed tip needs protection because it is particularly vulnerable to damage. Prongs on the lobes can leave the cleft visible and help preserve the outline. For a smaller stone, check whether you can recognise the heart at normal viewing distance in the intended setting.
|
|
10.j) Marquise DiamondsBack To Table Of Contents |
Marquise diamonds have an elongated outline with curved sides and two pointed ends, usually combined with brilliant-style faceting. Their length can make them appear larger face-up than round diamonds of the same carat weight. However, compare actual length and width because carat weight alone does not describe their visible size.
When comparing outlines, look for matching curves and tips that align along the diamond’s centre line. A slender or fuller shape is a personal preference, rather than proof of better cutting. Also, inspect the bow-tie effect, a dark contrast pattern across the centre. View the diamond in motion and under different lighting to judge whether this pattern becomes distracting.
Finally, choose a setting that protects both pointed ends, which are particularly vulnerable to chipping. V-shaped prongs wrap around the tips, while a suitably designed bezel can also shield them. Attractive proportions and lively sparkle matter, but tip protection deserves equal attention in a ring intended for regular wear.
|
|
11.) Inside the Diamond Cutting and Polishing IndustryBack To Table Of Contents |
The diamond cutting and polishing industry transforms rough diamonds into finished gemstones within a wider supply chain. Manufacturers connect the rough diamond trade with businesses that sell polished stones or make jewellery. Their work combines skilled craftsmanship with commercial decisions about the finished diamond’s quality and value.
However, a diamond’s value does not depend on weight alone. Colour, clarity and cut quality also influence how professionals assess the finished stone. Therefore, manufacturing decisions matter because they shape the appearance and characteristics of the product that enters the polished diamond market.
For buyers, this provides useful context: a polished diamond represents both the starting material and the choices made during manufacturing. Also, its retail price reflects factors beyond the workshop, including demand, competition and taxes. Understanding these distinctions helps explain why cutting quality and selling price require separate consideration.
|
|
11.a) The Diamond Trade: From Rough to PolishedBack To Table Of Contents |
The natural diamond trade connects mining and rough diamond sales with cutting, polishing and the sale of finished gemstones. After sorting, rough diamonds enter the manufacturing stage. Polished stones then move through businesses that supply loose diamonds or manufacture jewellery, eventually reaching retailers and their customers.
However, this journey can involve several companies and countries. Mining, manufacturing and selling are distinct activities, even when a business participates in more than one stage. Therefore, the country where a diamond was polished or purchased does not necessarily identify where it was mined.
Documentation helps connect these stages, but a quality assessment and an origin confirmation answer different questions. For example, GIA’s Diamond Origin Report requires analysis of the rough diamond before polishing. GIA then matches the finished stone to the recorded rough using scientific data, alongside the required origin documentation.
For buyers, the practical distinction is between knowing a diamond’s quality and knowing its documented journey. If a seller claims a particular mining origin, ask what evidence supports that claim. Also, check what the accompanying report actually confirms rather than assuming every grading report traces the stone back to its source.
For the wider sourcing discussion, see our guide to ethically sourced diamonds.
|
|
11.b) How Manufacturing Decisions Affect a Diamond’s ValueBack To Table Of Contents |
Manufacturing decisions affect a diamond’s value by determining its finished weight, proportions, inclusion placement and quality of finish. These characteristics influence both its appearance and its quality assessment. However, retaining the most weight does not automatically produce the most valuable or attractive finished stone.
For example, retaining extra material in a thick girdle can increase carat weight without increasing visible size proportionately. Commercially important weight thresholds can also influence cutting decisions because price per carat can rise at familiar sizes. Therefore, a heavier diamond may command a higher price while offering little additional visual presence.
Inclusion placement creates another trade-off. Removing an included area sacrifices weight, but it may improve the finished stone’s clarity. Alternatively, retaining an inclusion near the edge may make it less noticeable than placing it beneath the table. The outcome depends on the inclusion’s size, position and nature; removing one feature does not guarantee a particular grade.
Finally, facet alignment, polish and proportions influence the result beyond its weight and clarity. Poor proportions can reduce brightness, while an extremely thin girdle can leave vulnerable areas. For buyers, the useful question is whether the retained weight contributes to an attractive, durable diamond. Compare measurements, appearance and grading information together rather than treating carat weight as a complete measure of manufacturing quality.
|
|
12.) Frequently Asked Questions About Diamond Cutting and PolishingBack To Table Of Contents |
These frequently asked questions cover a diamond’s appearance before cutting, the tools involved and the purpose of polishing. They also address inclusions, colour considerations and the possibility of recutting or repolishing a finished stone.
However, each diamond has different characteristics, so the outcome depends on the individual stone. The answers below explain what cutting and polishing can achieve, alongside the limitations that matter when assessing rough or finished diamonds.
|
|
12.a) What Does a Diamond Look Like Before Cutting and Polishing?Back To Table Of Contents |
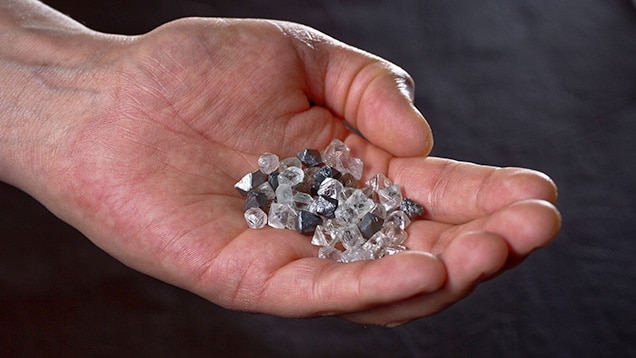
Before cutting and polishing, a natural diamond appears as a rough crystal or fragment rather than a finished, faceted gemstone. Some have sharp crystal faces, while others have rounded outlines or irregular broken surfaces. However, rough does not necessarily mean dull or cloudy: some unpolished diamonds are remarkably transparent and have naturally glossy surfaces.
A familiar rough diamond shape is the octahedron, which resembles two pyramids joined at their bases. Other examples include flat triangular crystals called macles and rounded or irregular forms. Natural growth, breakage and partial dissolution within the Earth can shape these outlines and surface textures.
Therefore, a rough diamond’s exterior does not tell the whole story of its potential as a gemstone. A glossy surface is not a polished facet, and transparency alone does not establish finished quality. Assessing the individual crystal requires more than comparing its appearance with a sparkling diamond in a ring.
|
|
12.b) What Tools Are Used to Cut Diamonds?Back To Table Of Contents |
Diamond cutters use specialised saws, lasers, cleaving tools, bruting machines and polishing wheels, depending on the task. No single tool performs every stage. Separating a rough crystal, shaping its outline and creating its facets require different equipment.
For example, mechanical diamond saws use diamond abrasive on a rotating metal blade, while laser systems remove material along a planned path. Traditional cleaving instead uses a blade and hammer to split the crystal along a suitable cleavage plane. Bruting machines shape the outline through controlled abrasion.
Finally, a rotating metal wheel called a scaife forms and polishes the facets using diamond abrasive. A dop holds the stone, while the tang helps the polisher control its position and facet angle. Therefore, “diamond cutting” describes a group of manufacturing operations, rather than simply slicing a stone with a blade.
|
|
12.c) Do Diamonds Need to Be Polished?Back To Table Of Contents |
Diamonds intended for conventional faceted jewellery need polishing during manufacture to create smooth, finished facets. However, a finished diamond does not normally need repeated polishing as routine maintenance. Cleaning and polishing are different processes.
During manufacture, the polisher removes diamond material to form and finish the facets. Their proportions, alignment and surface quality contribute to the stone’s appearance. By contrast, cleaning removes oils and dirt that can dull an already polished diamond without changing its intended shape.
Therefore, if your diamond looks less sparkling, start with appropriate cleaning and a jeweller’s inspection rather than assuming it needs repolishing. Ask the jeweller to distinguish surface deposits from actual damage or finish defects. This helps avoid unnecessary work on a stone whose facets may simply need cleaning.
|
|
12.d) Does Polishing Remove All Diamond Inclusions?Back To Table Of Contents |
No. Polishing does not remove all diamond inclusions. It works on the stone’s surface, while many inclusions lie inside the crystal. Consequently, a diamond can have smoothly polished facets and still contain internal crystals, fractures or other clarity characteristics.
Cutting and polishing can remove an inclusion if the manufacturer removes the diamond material containing it. However, reaching a deeper feature requires sacrificing surrounding material and may change the stone’s weight or proportions. A better surface finish alone does not make an internally included diamond flawless.
Also, inclusion visibility and surface smoothness are different qualities. Some inclusions remain difficult to see without magnification, while others are more noticeable because of their size or position. Therefore, assess clarity separately from polish, and treat any promise that polishing will remove every inclusion with caution.
|
|
12.e) How Does Diamond Colour Affect the Cutting Plan?Back To Table Of Contents |
Diamond colour affects the cutting plan because shape, proportions and facet arrangement influence how colour appears in the finished stone. For near-colourless diamonds, cutters consider brightness alongside visible body colour. However, with fancy-colour diamonds, an attractive, stronger colour appearance can become the main priority.
For example, certain radiant-style cuts can intensify the face-up appearance of yellow diamonds. Their proportions alter the paths light takes through the stone, which can make existing color look richer. This changes the presentation of color rather than creating a new color through treatment.
Color location also matters. In some natural green diamonds, much of the color lies near the surface. Consequently, removing that material during cutting can remove valuable color, so cutters may preserve selected areas of the original rough. Therefore, a suitable plan depends on the individual diamond’s color and its distribution, alongside weight, clarity and durability.
|
|
12.f) Can a Finished Diamond Be Recut or Repolished?Back To Table Of Contents |
Yes. A skilled diamond cutter can recut or repolish a finished diamond when its condition and proportions permit. Recutting changes the shape or facet arrangement, while repolishing generally addresses the finish of existing facets. However, both processes remove diamond material, so some weight loss is unavoidable.
The work may improve appearance or remove a damaged area, but the result depends on the individual stone. For example, GIA documents a fire-damaged diamond that became smaller after recutting removed its burned surface. Therefore, assess the expected improvement alongside the remaining weight, dimensions and cost rather than assuming the work will increase value.
Color and treatments also require attention. Recutting or repolishing can change the color of irradiated diamonds, while removing surface material can affect some natural green diamonds. Before proceeding, ask a qualified cutter to explain the proposed changes, likely weight loss and relevant risks. A more attractive finish may be worthwhile, but it does not guarantee a higher selling price.
Read More Articles About Diamonds:
